This post started out simple enough and then became very, very, very long, so I decided to divide it up into a little series, sort of like a British television show. Hopefully I can keep it witty – or at least educational – and within the standard six episodes. On to episode one!
A while back I started working through the book “Beginning ASP.NET 4 in C# 2010” (MacDonald, Matthew. Beginning ASP.NET in C# 2010. USA: Apress, 2010). It is quite thorough — all 981 pages of it — but there is something exciting about becoming immersed in a massive new world with a confident writer as your guide. ASP.NET is a new world for me. It takes many of the tools I already have — HTML, Javascript, CSS, bits of database programming — and combines them in a structured, object-oriented environment full of web controls and exception handling.
At this point in my journey I have traveled through many fundamental lands including a run-through of C# basics, object-orientation concepts (hello memories of software engineering classes!), error handling and most recently visiting state management. Around the time spent in web forms and web controls, I built a simple application based on a sample called “Greeting Card Maker” in the book. My sample uses similar concepts as the sample in the book, as well as some of its code bits and conventions, and is called “Magic Menu”.

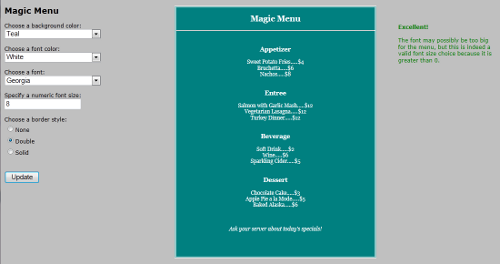
“Magic Menu” takes a standard restaurant menu format and allows the user to change some style elements. Mind you, the style elements may not always produce the most aesthetically pleasing design, but this was more about getting comfortable using an ASP.NET web form with web controls, some object-oriented C# and all in conjunction with a little CSS to build my first official ASP.NET/C# app. Once I reached the error handling section of the book, I tossed a little bit of that in on the setting of font size, just checking to ensure it was larger than 0.
Since this site is hosted on a LAMP setup, it would take some magic of sorts to show you “Magic Menu”, but fear not — I am still going to run through the code and link you to a practically identical jQuery version in another post!
So let’s get started on that code…
The web app was built in Microsoft Visual Web Developer 2010 Express. The general setup for this simple type of web app would be to go to File | New Web Site and choose Visual Basic or Visual C# under Installed Templates – what language you use is up to you, I chose Visual C# as this what the book mainly uses and I wanted to learn this language, but the idea behind .NET is that you can use either pretty much interchangeably – then choose ASP.NET Empty Web Site on the right. If it is not already visible, select View | Other Windows | Solution Explorer to see the Solution Explorer, usually docked on the right of the interface.
In the Solution Explorer, you will see the web.config xml file, which contains configuration settings used by the server for your ASP.NET web site/application. For example, by default there is a targetFramework="4.0" attribute of a <compliation> tag which indicates what version of .NET you are using for your web site/app. The default web.config file was used in this solution.
“Magic Menu” has three other files involved in the solution that you will see in the Solution Explorer:
Default.aspx– the starting page for the web app; added in this case by going to Website | Add New Item and selecting Web Form. This is where you will find your HTML code.Default.aspx.cs– the Visual C# code for the web app. This is where you will find classes and methods defined, i.e. where all the action takes place. The combination of the C# file withDefault.aspxfile makesDefault.aspxa web form, as opposed to a regular HTML page on its own.magic_menu.css– an additional CSS file used in this solution for some general styling
In the next part of the series, we’ll dive into Default.aspx.
