Originally, I decided to build my portfolio site on Drupal. Even before that, I wanted to build my portfolio site from scratch. Ah me and my “old-school” ways. After some research and tips from a fellow Web developer, I decided what I was really looking for was a site that was minimal effort to get up and running — and maintain — so that I could focus on my actual training and building of samples to be housed there. A free content management system sounded like the way to go.
Drupal seemed to win out in the end over WordPress with its developer-centric reputation. I figured I could dissect and learn from it as well as have a site that fit my needs. I went about setting up Drupal locally, and happily worked away at some learnin’ and some articles. Life got busy as it does, and when I returned a short while later (things move fast in the Web world lately!) it seemed WordPress was gaining even more popularity for its developer aspects and I heard of its even greater ease to set up. I wanted to really get going on my live site. So I decided to switch, and I did this and went live in one night. Nothing like jumping in! However, the local Drupal site was an excellent way to get myself into the blogging mode, and I like to think of it now as my practice blog. Here are the major steps I took when setting up my local Drupal site, which you may find useful.
Installed XAMPP and Drupal. XAMPP is an excellent local Web server platform that allows you to work on your Drupal site on the comfort of your machine until you are confident enough to show it to the world. It allows server side scripts like PHP (which Drupal — and WordPress — are based on) to run just lovely. The following link was helpful to me. Although the comprehensive guide deals with Drupal 6, which has a lot of differences on the administration side than the latest Drupal 7, which I was using, you just adapt as you need (since Drupal 7 has tried to make all the admin stuff easier for you anyway!)
Getting Started with Drupal: A Comprehensive Hands-On Guide
Now after that, I jumped back and forth between various configuration tasks. Setting up a theme, adding my own logo, adding some basic pages and articles, organizing the articles with my taxonomy, and basically getting to know the Drupal 7 administration tools. I searched using Google for various answers I wanted to know at the time (it’s amazing how many people ask about the exact same thing out there, even in your own words!) This site was also helpful:
22 Excellent Tips for New Drupal Developers
Along the way I got into some interesting areas, like installing a component to show an image gallery of my cats.
I also wanted to write articles about my ASP.NET / C# development work, so I had to figure out how to get XAMPP to run ASP.NET. The following article was helpful.
I also had to make a couple of small adjustments to my first ASP.NET / C# project to get it to run properly:
- Removed the inclusion of
System.Linqin my ASP file - Removed the
targetFrameworkattribute in thecompilationtag in my web.config file
Both of these issues were probably to do with a lower version of ASP.NET that XAMPP may support and did not seem to affect my project.
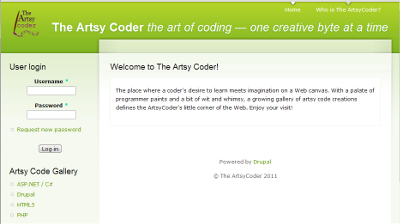
That is the story of the original artsycoder site and here is what it looked like. Although it was only a practice blog in the end, whether you choose Drupal or WordPress, they both look to have their advantages so I think you’ve made a great choice!

